Welcome to the new airline manager game - AirwaySim.
You will be playing against other players around the globe. In the following chapters of the manual we will show you how to successfully take your first steps in the game.
Welcome to the world of airline management!
Simulation Concepts
First, please take a look at the basic concepts of AirwaySim to understand how different scenarios ("game worlds") and their time works:
- AirwaySim's Principles, a few words about the base concepts
- Simulation Time Logic, details on how the simulation progresses
Choosing The Game
There are various different scenarios and themes available to play in our airline game. All the games can be accessed from the AirwaySim Game Area.
The Beginner's games are easier and shorter than the full-length games with seasoned players. The free 7-day trial mode is also available here.
All the game worlds are independent from each others. Airlines are not carried over from game to another (this is because the settings and time/era of each world varies considerably). You may play at different worlds at the same time.
Creating An Airline
In most game worlds there are two methods of setting up your airline, called Easy Start and Advanced Start. In the Beginner's World scenarios the system defaults to Easy Start mode which will help you to get going quicker.
Basics
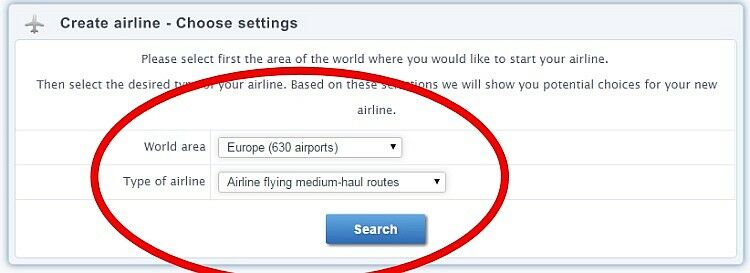
When you have joined the game world, you will be first asked for the type of airline you would like to create. You can choose the area of the world (continent) and type of airline - these are:
- Airline flying small / shorthaul routes
- This is a regional airline flying smaller turboprop or jet planes (usually less than 70 passengers capacity)
- Airline flying medium-haul routes
- This option will give you an airline flying longer routes with about 100-250 seat aircraft.
Choose your desired area and click 'Search'.
Note: In some cases it may be possible that the wizard behind this system does not find any suitable airports to start at. In such case please simply choose another world area or another type of airline. The system takes into account the competition of existing airlines when determining the suitable airports, so all world areas may not be available.
Choosing the HQ
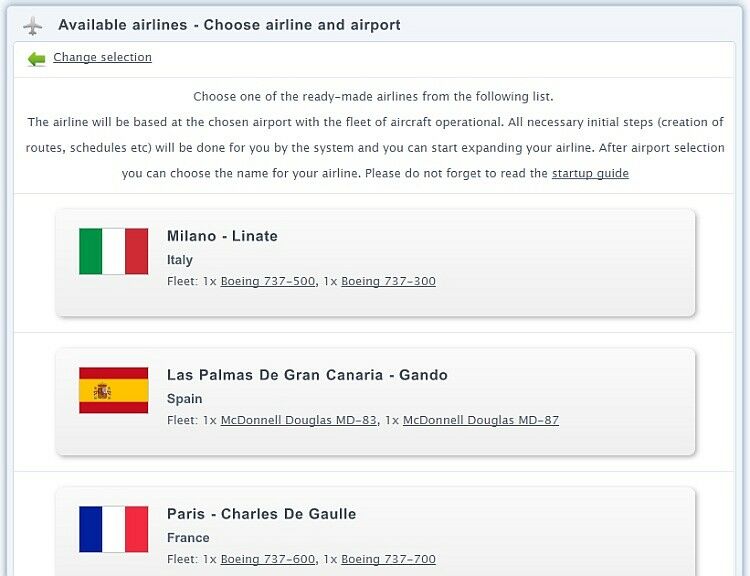
Next step is to choose the home base (HQ) airport and your starting aircraft fleet.
All your routes must always depart and arrive to your home base airport (until you can open other base airports at a later stage in the game). Please also understand that there may be other airlines already based at that airport, or flying to it, and this creates competition to your routes. The system has looked at potential airports from the region you chose and will present up to five different choices for you.
The choices are based on available airport capacity (airport slots) and number of potential routes from the airport (route demand) among other things. Generally speaking any of the suggested choices should be suitable for your new airline.
Each of the choices will contain information about the airport and the number of types of aircraft your airline will operate initially. In the Easy Start mode, you cannot change the suggested aircraft fleet types. To do that, you must choose the Advanced Start mode and make all selections yourself (if you are interested in that mode, please see the respective manual chapter).
Clicking on any of the airports will bring up more details.
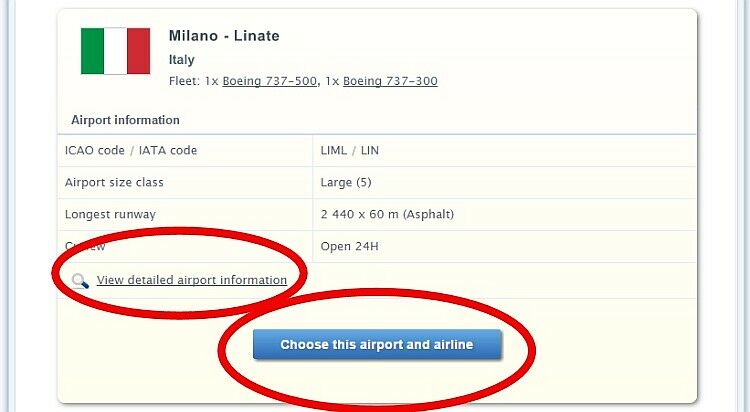
In this example we have several good choices, but we'll select the first one, Milano-Linate. Clicking the airport will select it and will show additional brief details of the airport.
You should click also on the "View detailed airport information" link to see in-depth details of this airport.
If you are happy with the chosen airport, click "Choose this airport".
Naming your airline
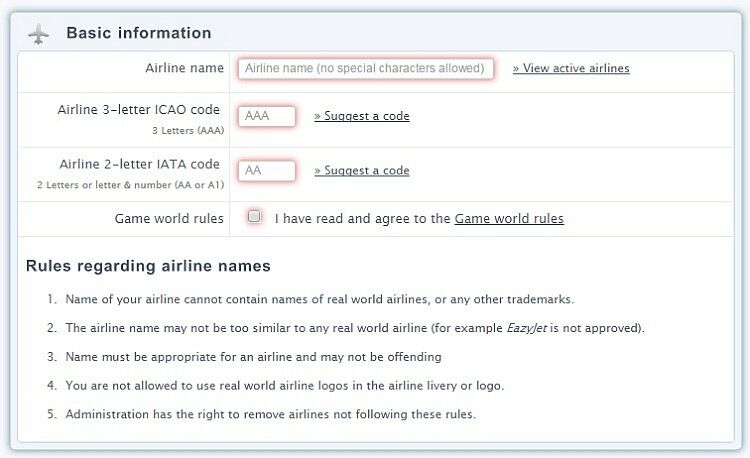
At the final step, you must enter the name and details of your airline. You must also choose the 3-letter ICAO code and 2-letter IATA code for the airline, or you may let the system suggest them for you (using the "Suggest a code" link next to each input box).
Please also take care that your airline name is not too similar to any other airline already in this game world. You may view a list of airlines participating from the "View active airlines" link next to airline name input box.
When you are happy with the choices (you can go back anytime still at this point and choose another airport), please click on the Create Airline button and the system will found your new airline.
The process of generating the airline may take 5-10 seconds - please be patient. After this the airline is ready and aircraft will be flying when the game day changes the next time.
Basics Of The Simulation Interface
When you have created your airline you are transferred to the main interface.
There are tens of different sub-pages and functions but to get started we only need to a handful of them - you may get familiar with the rest later.
Here’s a quick overview of the interface:
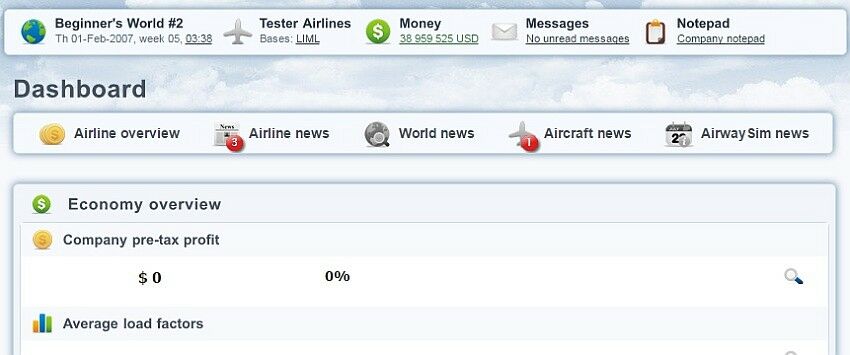
The top section contains the main navigation. Below that is the status bar with the details of the current game world and your airline. This status bar includes the current time in the simulation, the money your airline has in it's bank account, and notifications of any incoming messages. Below this is the actual content of the page.
The interface is divided into four main categories, each having several pages. They are briefly explained next - click around on various pages to find out about them.
Dashboard
- Dashboard: Collection of main statistics and news
- Statistics: Detailed stats of all airlines in the simulation
- Settings: Settings related to your airline and the interface
- View airlines: View details of other airlines in the simulation
Office
- Messages: The in-game message box (incoming system messages)
- Income statement / Balance sheet / Cash flow statement: Three financial reporting pages, vital for your business
- Personnel office: Management of your staff (automated by default)
- Loans: In case you need financing from the bank….
- Marketing: Add marketing campaigns to boost your Company Image
- Base airports: Later in the game you can open additional bases to expand
- Company image: Track the brand awareness of your company
- Route image: Track the awareness of your different routes
- Fuel management: View fuel prices and make different fuel contracts
- Transported pax: A statistical page
- Declare bankruptcy: If you are going bust, you can close the airline and start over
Aircraft
- My aircraft: List and manage all planes you own or operate
- New aircraft: Page to order aircraft from the manufacturers (factory-new)
- Used aircraft: Market of pre-owned aircraft (supplied by AI aircraft brokers)
- Configure aircraft: Change seating configuration of your planes
- Fleet commonality: Statistical information of your training/maintenance costs
- Aircraft insurance: Cost details of your insurance policies
- Aircraft on order: List of planes you have ordered, but not yet delivered
- Compare aircraft: View details of available aircraft
- Production slots / Aircraft information: Two statistical pages of aircraft in production and in operation
Routes
- Manage routes: List and manage all flight routes you have created
- Open new route: Plan and open a new route from your base
- Scheduling: The flight schedules of your aircraft
- Route planning: A page to pre-plan new routes
- Price management: Price details of your routes
- Flight delays: View the reasons of delays/cancellations of your routes
- Airport information / Airport slots: Search and browse available airports and their stats
- Route map: View a map of your routes
Once you have taken a quick look around, it is time to dig deeper and get to know your airline, and on how to expand it.
Overview Of Your New Airline
Now that the system has created your airline based on your desired home base airport, here is an overview to help you get acquainted with your new airline.
Even though your Dashboard looks very empty, your airline has active aircraft and routes. The Dashboard is the main location for news and events happening in the game world. It also shows a quick overview of your airline - but since we are new and just started, everything is still zero - but the data will appear soon (after the game day changes).
Aircraft
Your airline has 2-3 used aircraft that are leased ( = you rent but not own them) from AI controlled aircraft brokers.
Your aircraft are in good condition, with all the maintenance checks valid. The model and age of these aircraft depends on the airport chosen and what has been available at the aircraft market.
Routes
Several routes have been automatically generated for your new airline.
These routes have been created to potential destinations from your home base airport based on the passenger demand of each route.
All routes must depart from your home base airport, and arrive back there too ("A-B-A" rotation). The system has also taken into account the supply from other competing airlines (if any) when determining the destinations to fly to.
Airport Slots
When the system created the routes for your airline, it also automatically acquired airport slots for each airport - these are the takeoff rights from each airport.
Generally you do not have to worry about the airport slots since they are processed automatically - but some busy airports may be limited in the number of available slots.
Staff and Marketing
Your airline also has an active marketing campaign, and several members of staff have been hired automatically.
Your marketing efforts determine the level of company image your airline has - this is the "brand rating" and general awareness of your airline.
Your staff members are hired automatically by default and in the future too (unless you change this setting), but you may wish to eventually familiarize yourself with this side of the simulation too.
Other Settings
You may also choose various settings that help the management of your airline from the Dashboard->Settings page - but all these have been chosen for you so that everything should be a-OK!
Game Progress and Task
By now, you should learn about how the simulation moves forward and what are your goals from the two chapters we recommended earlier:
- AirwaySim's Principles, a few words about the base concepts
- Simulation Time Logic, details on how the simulation progresses
It's good to remember that you set your own goals on what you wish to achieve in the simulation - there are unlimited choices, and you can grow your airline to be what ever you desire!
Now when your airline is up and running, your routes will start to fly. But it takes a while before you see the results.
You will see the results of the first day of operations when the game day has changed. Normally each simulated day is 20-35 minutes long, depending on the game settings, and you can see the game clock at the top part of the interface at all times. When the day changes the results from that passed day are fed to the interface and are viewable by the airline managers.
So you will need to wait usually about 15-20 minutes before any results are posted. But this time flies by when you check out the details of your new airline!
Remember also that most of the pages show combined average results from the previous 7 game days. So that completely full results, change graphs and other fully detailed history will be available after one - two full game weeks (= about 4-6 hours of real time).
Aircraft In Detail
Let's then take a detailed look at the aircraft you have.
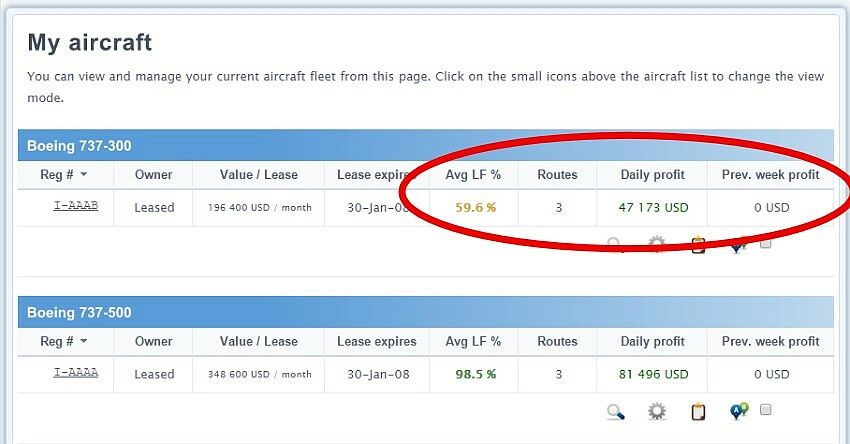
The information on your aircraft fleet can be seen on many different pages but the best overview is the My Aircraft page (navigation: Aircraft -> My Aircraft). This page displays the vital statistics of all your planes, and you can click on each aircraft for more information.
My Aircraft Page
Each of your aircraft have been assigned a unique registration number. These are used to identify your aircraft, but it is optional: if no registration is set, then the MSN (manufacturer serial number) is shown instead. You can also assign nicknames to your planes if you wish.
All of your aircraft are initially leased from computer-controlled aircraft brokers. These aircraft are old (not factory new) and the duration of the lease deal is 1 year. Leases can be terminated early, or they can be extended before they end. In normal cases the automatic extension of leases is turned on (your staff will make a 1-year renewal of each lease before they end - unless you tell them otherwise). You may also lease aircraft from other players (or even lease your planes to them once you own them) - these are covered later in other manual chapters.
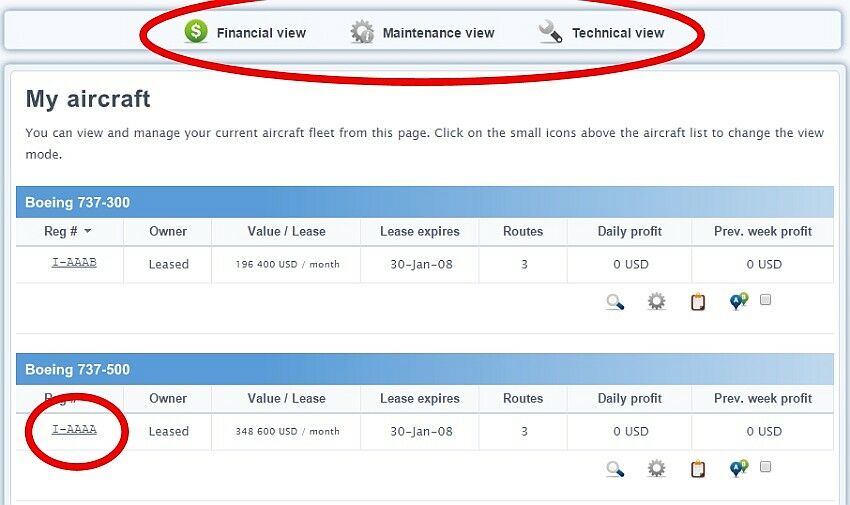
If you navigated to this page right away, you would have noticed that it does not still show any profit figures since the aircraft have not flown yet; like in the picture below. The profit figures will appear soon after your start...
The page has three sub-areas:
Financial view
- The default view showing the ownership, route and profit status of each aircraft.
- Also shows different notifications and alerts of each aircraft, if any.
Maintenance view
- Overview of the validity of the maintenance checks.
- There are four types of checks required, named after letters A, B, C and D.
- A and B checks are performed on weekly and monthly basis, while C and D checks are the heavy maintenance checks and performed every 1 (C) or 8 (D) years.
- Each aircraft has also a condition level ("condition %"). At the start your aircraft are in at least 75% condition, and the scheduled A and B checks make sure the condition remains fairly well before the next heavy C or D check.
- Remember to keep an eye on the technical condition (and also remember to look at it when you get more aircraft from the used market to your fleet).
Technical view
- This area shows some chosen specifications of each aircraft, like engine type, seating configuration and the range.
- The range in the simulation is always expressed in nautical miles (NM).
- Other notable technical figures are the average fuel burn and the runway requirement - each depend on the chosen aircraft model, engine type and weight variant.
Click on some of your aircraft's registration (or the magnifying class icon) to view the detailed aircraft overview page.
Aircraft Information Page
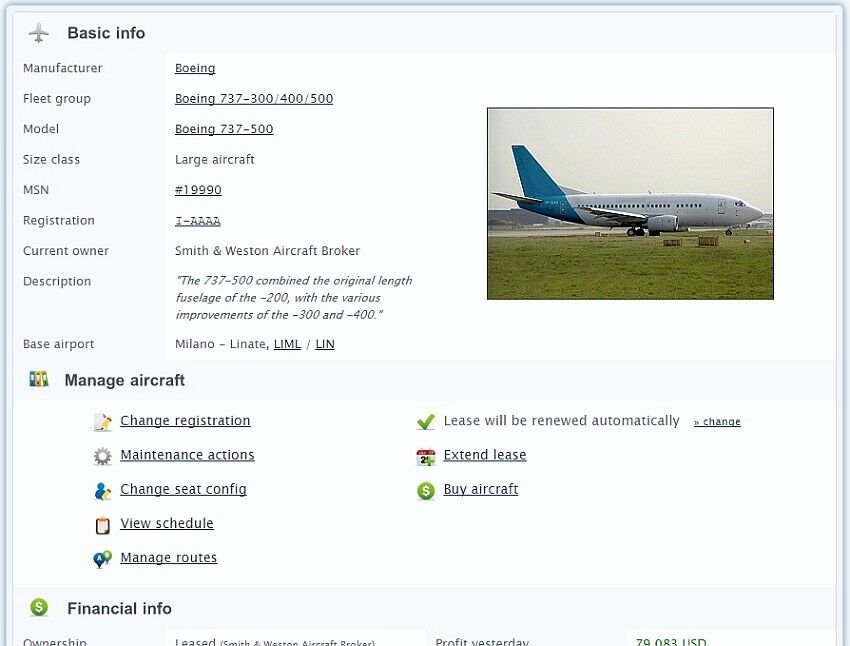
The details page will list all data of this particular aircraft. Feel free to browse around and appreciate the level of detail available. AirwaySim's database contains practically every commercial aircraft ever build since the 1930s!
Fleet Groups
You will notice that all your aircraft are of the same fleet group.
In our example the aircraft is a Boeing 737-500, and the B737-300 and B737-400 models are fully common with this model. But getting for example the older B737-200 is not common with this fleet group anymore, so in this case using that model for future routes is not recommended.
But if you have many different types of routes available, or the used aircraft market does not have good choices, you may need to add another fleet group to your airline's fleet. Be aware that this will generate extra overhead costs - but do not be too afraid of it; since if the operation with the new fleet is profitable it will easily cover these costs.
Aircraft Financials
Some other notable details about the aircraft page:
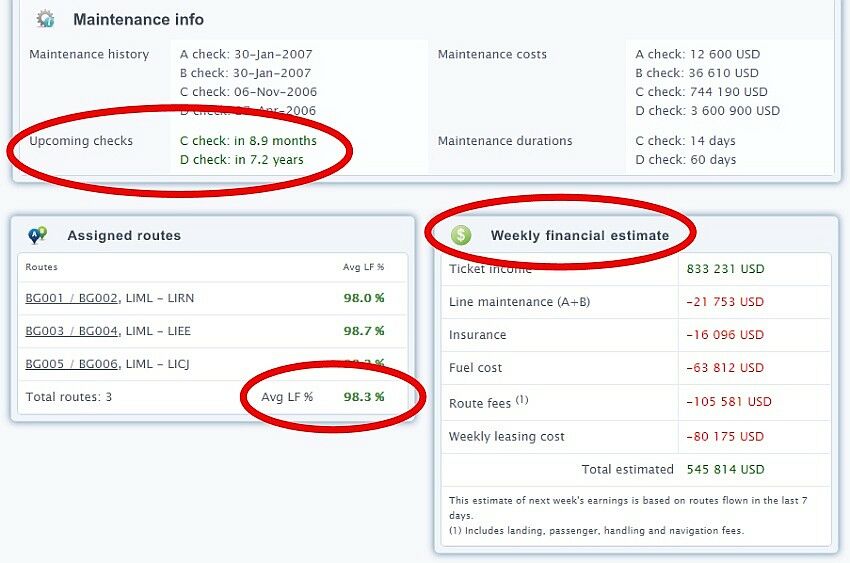
Firstly the maintenance area tells you the time until next "heavy" (C / D) maintenance checks, and the costs and durations of them.
But you should be aware that the older the aircraft gets the more expensive the maintenances will be. Generally using aircraft older than 25 years is not a good idea. Another good tip may be to avoid the costly D checks when your airline is young - the heavy check can be very expensive and your plane will be out of profitable flying for considerable amount of time. So you may wish to time the end of your leases so that you do not have to do this check in-house, but instead return the plane back to the lessor before the maintenance deadline.
At the very bottom are the routes and financial overviews for this aircraft. The Weekly Financial Estimate will try to figure out the total estimated operational profit/loss of this aircraft based on the history of the routes it has flown recently. Please remember that this (like no other aircraft or route profit figure!) does not take into account the corporate overhead costs that affect all operations. These are staff wages, marketing costs, fleet commonality costs and other such expenses that cannot be pinpointed to a single route or aircraft. So to judge the overall profitability of your airline you must use the financial reporting tools (under Office section) - more of these later.
The routes section at the bottom-left will show the average load factor (LF%) of all routes assigned to this aircraft.
In our example image the averge load factor of all routes of this plane is 98.3% which is very high and we should increase the ticket prices of any route that has approximately over 90% load factor. Usually the optimal sweetspot for maximum revenue is around 80-90% load factor - but this depends on individual route and possible competition. More about routes later....
Finally - the My Aircraft page will also show the same overview of profits and load factors, once the results have appeared after the game day has changed (every 20-30 minutes).
Routes In Detail
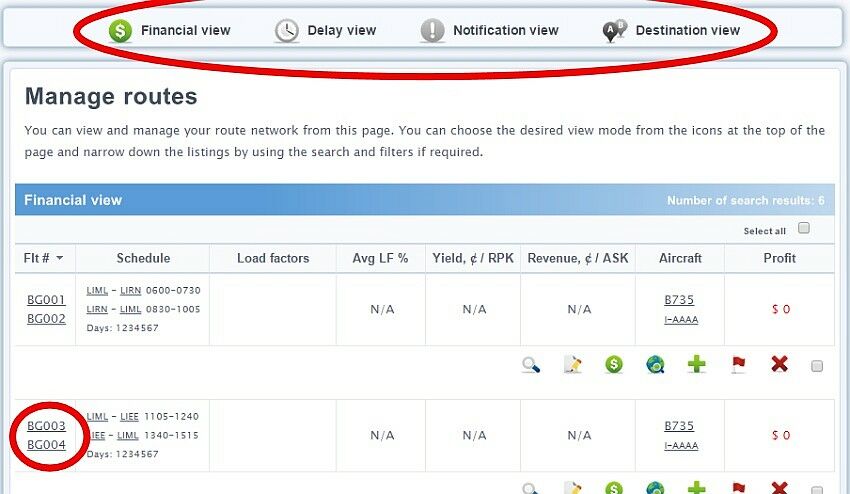
Next we'll look at our routes. The system has made a few for us and has done its best to find suitable and profitable routes. These are the initial and automatically created routes, and rest of them you will need to create by yourself (after you are familiar with the system). Please navigate to the Manage Routes page (navigation: Routes -> Manage Routes).
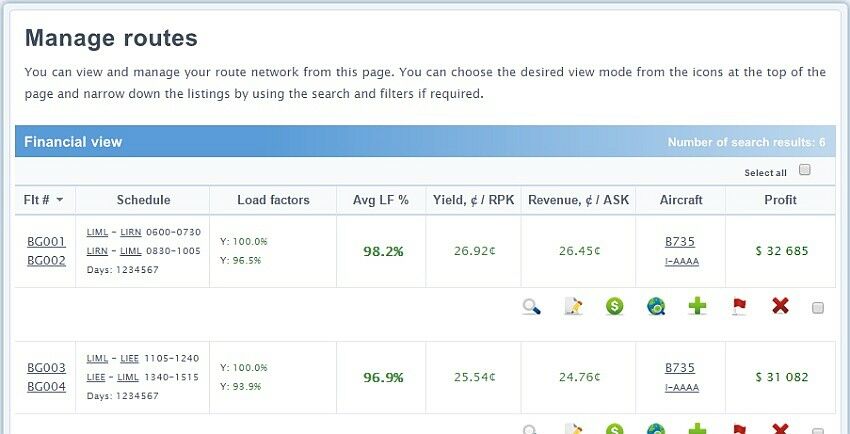
This is a similar overview page like the previously looked My Aircraft page, but on routes instead. It also has different sub-areas and similar set of filters to narrow down the results if you need to look something in particular.
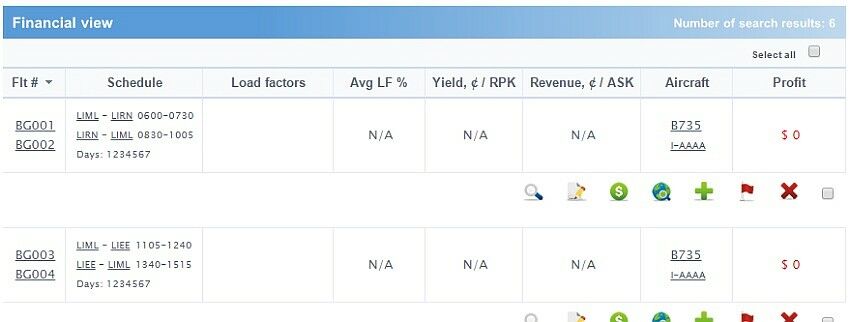
You will notice that there are several routes to different destinations - you can hover the mouse over each airport code to find out what it is. All routes are in the 'Easy Start' mode created for each of the 7 weekdays and only for the daytime (first departure at 06am and last arrival around midnight).
Again please remember that the financial results may not yet be available, so don't worry if the figures are all "N/A" and "0" still.
The page has four sub-areas:
Financial view
- The default view showing the route schedule, load factors and other financial information.
- LF = Load Factor. In other words how full the aircraft is. As we looked at the previous chapter, near 100% load factors are not optimal.
- RPK = Revenue Passenger Kilometers and ASK = Available Seat Kilometers are units of measurement used to calculate different financial values.
- Yield = cents per RPK. This is an average figure on how much a passenger is paying on this route to fly one kilometer.
- Revenue = cents per ASK. This is an average value describing how much revenue is brought in by every kilometer flown.
- Both RPK and ASK can be RPM and ASM (miles instead of kilometers) if you choose "imperial units" from your settings.
- The last value, profit, takes into account the ticket income, fuel costs and all other expenses (like airport and handling fees) of the route. It does not take into account the company's overhead costs like staffing and marketing which cannot be pinpointed to a single route.
Delay view
- Overview of the amount and reason of delays and cancellations on your routes.
- There are many different reasons for delays and cancellations, but the 'Easy Start' setup has been done so that you should not need to worry about these for now.
Notification view
- Shows any routes that are not flying currently for some reason (you should have none at this time).
Destination view
- Groups all routes to the same destination together for easy overview of the financial performance.
Click on some of your routes to find out more about it. This brings up the detailed route view.
Route Information
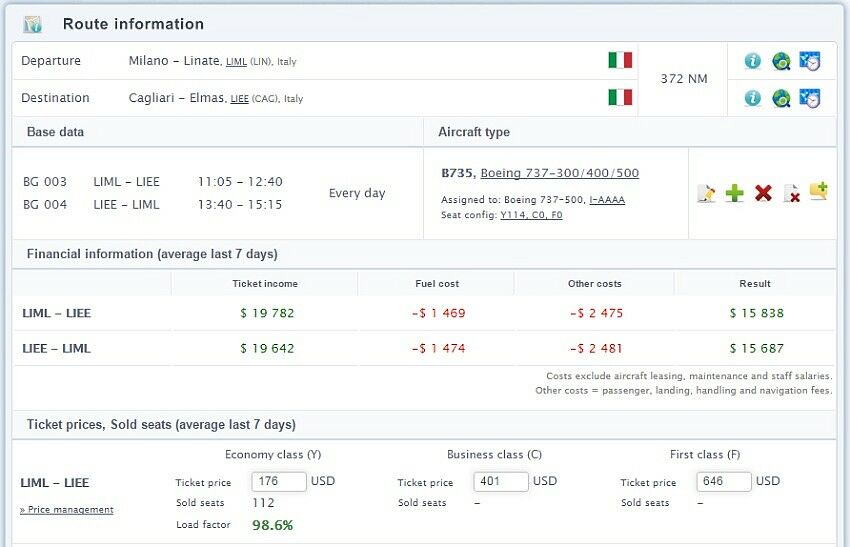
From here you can view and manage the ticket prices of this single route and view the statistics of this route.
You will see that the "sold seats" area (at the bottom of the picture) in this example shows nothing for Business Class and First Class. This is because our aircraft has no seats allocated for these travel classes (this might differ for your airline though!). Another reason could be that this route has no travel demand in these travel classes. Our aircraft is in the factory's default seat configuration and has in this example 114 economy class seats and 0 business & first class seats. You can change the seat configurations if you like, but it is not covered by the startup chapter.
Travel Classes
The short letters for each class are: Economy - Y, Business - C, First - F. These are used in various locations of the interface.
Generally only long-haul routes have First Class demand. Business Class demand can not be found on very short and/or thin routes. So, always remember to look into the demand before making decisions about how to set up the seat configuration, if you decide to change them.
Price Management
The price management can be done on a per-route basis or for all routes to a single destination. In case you wish to change the prices, a gradual change of, for example, 5% or 10% at a time is recommended. Change the price, and wait a few game days to see the effect. You can also easily manage the prices from the Manage Routes page by clicking on the green dollar icon next to each route.
Route History
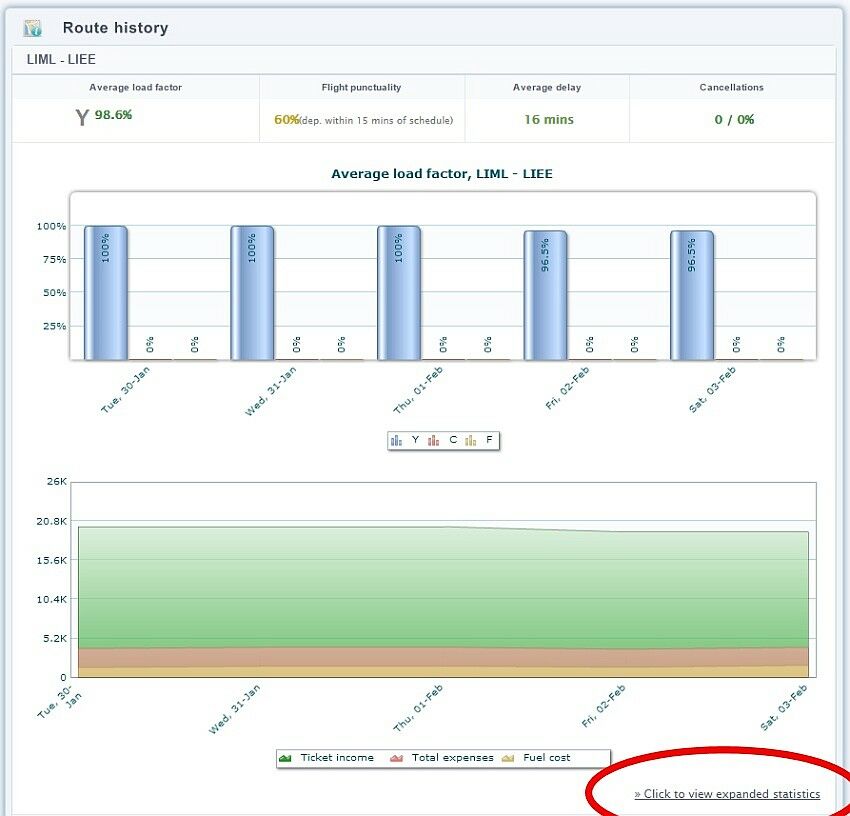
The bottom part of the route details page shows the historical performance of the route. In the example image below, our route has five days worth of history available (the system will store a few weeks worth of data for each route). You can even press the 'view expanded statistics' link at the very bottom to view the daily breakdown of the costs and sales.
Once the routes are flying you can see their performance from the Manage Routes page as follows:
Like previously mentioned, our routes in this example seem to be very fully sold, and our next step would be to increase the ticket prices a bit for more profits. But let's look at the last important step first, scheduling.
Scheduling In Detail
All routes must be assigned to some aircraft before they can fly. This is called Scheduling.
Scheduling Principle
In simple terms, you first create a route and in the route editor window choose to which fleet group you are planning the route for. This selection determines the flight times of the route (since all aircraft in the same fleet group have the same speeds).
Once the route is created you need to go to the Scheduling page and choose the individual aircraft you will assign this route to, and only after that will the route be flown.
Naturally any two routes cannot overlap on the schedule of the same aircraft.
Complicated? Do not worry - the system has generated the first routes and schedules for you, and you will learn how to do all of this in the later parts of the manual.
Schedule View
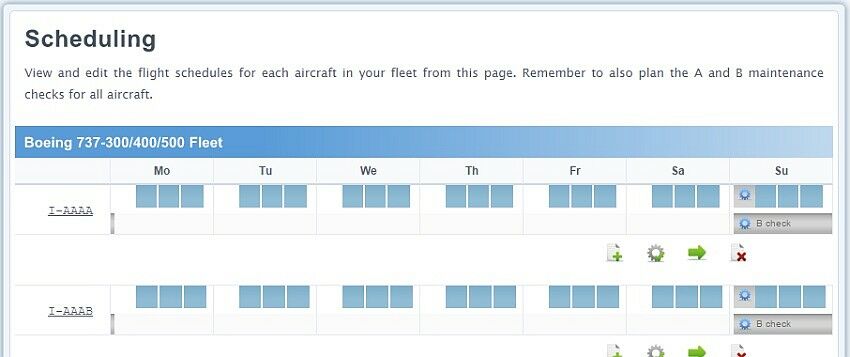
Looking at the Scheduling page (navigation: Routes -> Scheduling) you will see the list of aircraft we are already familiar with from previous pages.
Together with each aircraft are blue bars and grey bars. The blue bars represent time spent on routes. Grey bars are A & B maintenance checks which are required to be scheduled for each aircraft. And the white area is naturally unused time when the plane is sitting on tarmac at your base (and not earning any money).
Naturally we would like to maximize the air time (utilization) of all our planes - as much blue as possible and as little as white as possible in the scheduling bars.
But flying at the middle of the night may not be wise as passengers really dislike that. Usually the system-generated schedule is a good start but you might be able to make it more efficient once you have a bit of experience.
You can hover your mouse over the blue bars (and various other parts) to get more information of each segment (together with links to various functions).
The scheduled A and B maintenance checks are assigned also via scheduling page (C / D heavy checks were different, like you learned previously):
- The A check is performed every week and it can not overlap any flights - that's why it is on the same row as the blue flight bars. A check takes 5 hours.
- The B check is performed every month and it automatically overlaps any flights scheduled for that day (they will not count as cancellations!). B check takes 24 hours.
Our example has all checks marked on Sunday but they can be set on any weekday you desire. When the checks are on the schedule they are performed automatically when due.
You will need to create the schedule only once for each aircraft, and in this 'Easy Start' case the schedule of these two planes has been already made for you.
Only if you alter the routes so that the flight times change you will need to re-assign the route back to the aircraft schedule. This happens in similar manner like assigning new route to a schedule and it is covered later in this manual.
The scheduling page does not display any statistics or any other changing values like the other two main pages.
This covers the very basics on how your new airline is getting started.
Please remember that everything is up and running now and you should monitor the situation's development for a while. Be patient! You have enough money to get more aircraft (remember to lease from the used market) but you should not be too hasty.
Also keep in mind that AirwaySim is a very complex simulation. You are not expected to learn it immediately - it always takes a few tries and some days before you understand it. So be patient and do not be afraid to ask for advice in our forums or Discord.
Head over to the Part 2 of this tutorial to take a deeper dive into the airline management.


