This is the second chapter of the beginner's guide, and here we shall take a closer look of some features and learn how to expand the airline in a profitable manner.
Researching Destinations
All of the routes in AirwaySim have predetermined passenger demand levels (= how many passengers are willing to travel on that route) that shrink or grow over time.
Before you commit to an expensive aircraft purchase or lease, you must find out the potential for opening new flight routes from your home base. (Again please remember that initially all your routes must depart from your home base airport.)
Once we have figured out a number of potential destinations we can move to get a suitable aircraft for this. So please move to Routes -> Route Planning page now.
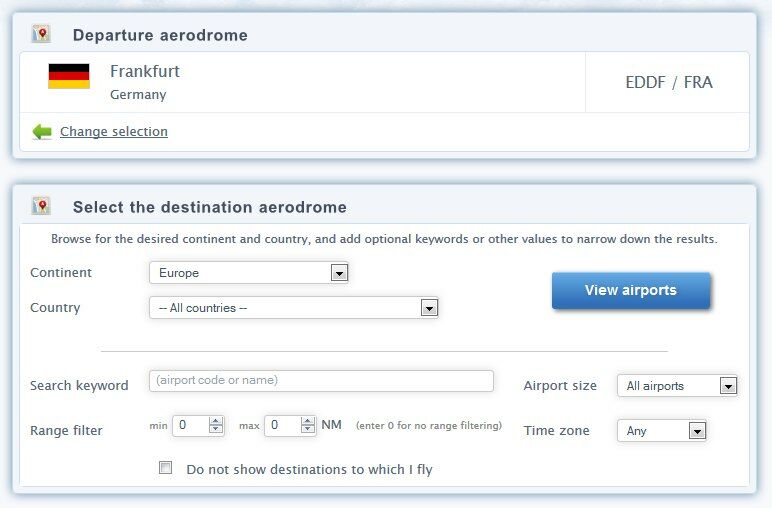
You will see your base airport at the top and a search box below it. In this example we’re using an airline that is based in Frankfurt, Germany.
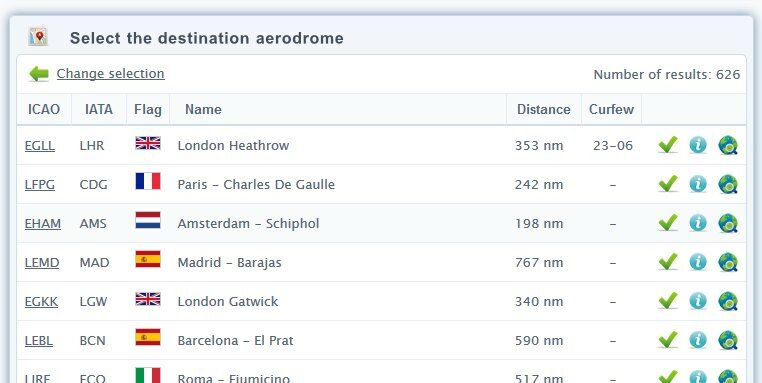
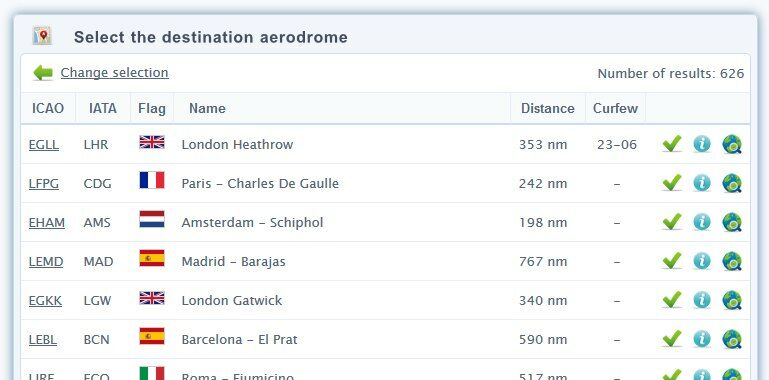
If needed you can narrow down the search parameters but the default suggestion of all airports on the same continent is good, so simply press View airports next. You’ll then see a list of airports corresponding to the search terms.
There are three icons on the right side of the list. Click on last icon (globe icon) to view the Route Planning information page – it’s an important page and tells us the details of the route segment.
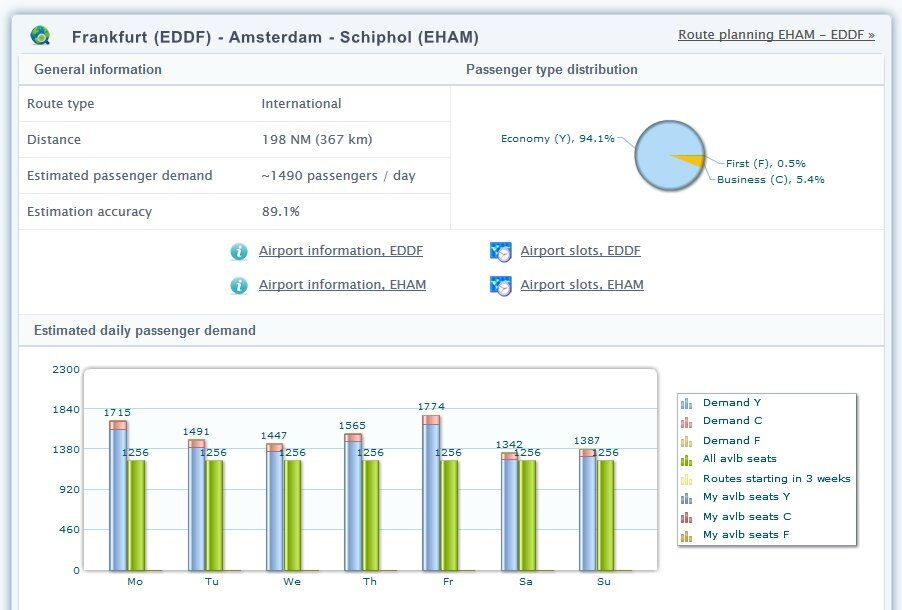
In this example we’ve clicked on the Amsterdam airport (EHAM / AMS). So it will then bring up the details of the route from our base (FRA) to it; FRA-AMS.
The top part of the page tells you some general details of the route, but the most important part of this page is the chart titled “estimated daily passenger demand”. This chart tells us what your staff has estimated as the daily amount of travelers on this route. The chart also tells you how many seats other airlines are providing supply on this route (if any). Finally, you will aslo see how many routes your airline is supplying (at this time of course none, since we don’t have any routes yet).
This bar chart may look confusing at first, but it’s really not. It’s divided into seven days, and each day has one, two or three bars (in this picture there are two per day).
Estimated Daily Passenger Demand
The first bar of each day (the one with blue and a bit of red on top) is the estimated demand. And this is what we’re mostly interested of. It tells you how many people are estimated to travel on this particular route. In our example (route between FRA-AMS airports) the estimation is that on Mondays a total of 1715 people wish to fly on this route, and on Tuesdays 1491, etc.
This estimation value is also divided into three categories according to the estimated travel class distribution. The airline tickets can be sold in three different classes in the simulation, and they are: economy class (Y), business class (C), and first class (F).
For short and domestic routes, the demand for “premium” products (i.e. first and business class) is lower. While on long routes, you will find more demand for these high-priced tickets. In this chart the different ticket classes are color-coded, economy (Y) being blue, business (C) being red and first (F) being yellow. You can see that this route-pair has mostly economy class demand and some for business class.
The second bar of each day tells you how many seats in total all airlines (your airline + all others) on this route are supplying. And the third bar (not in this picture) tells your supplied seat total on this route.
These two latter bars are not important right now, but for the future you should consider them too when you are investigating what your competition does. However, you should first consider routes that are underserved by the competition = where the green bar is less than the total demand bar (blue+red+yellow) - like we have in the picture. But, if you cannot find any such routes, do not worry since you can very well enter a competed market too - it just requires a bit more patience before profits start rolling in!
So most of all, we’re now interested in the fact that (in this example) the estimated average demand between FRA and AMS airports is roughly 1300-1500 pax per day, and also that the distance between these airports is 198 NM (NM = nautical miles; aviation’s distance measurement unit). In other words, it is a very short route with very plenty of passengers.
Please make a note of these, and then repeat the procedure for a few other airports too since we need about 3-5 good route-pairs to start our airline’s operations.
Please keep in mind that if the bars do not show any passenger demand, or very little (like less than 20 pax / day), the route is not worth flying.
In our example we’re planning to run a domestic short-haul carrier, so we’re looking for routes that have at least about 300 passenger’s worth of demand each day, and the destination cities should not be farther away than about 1000-1500 NM (as a rule of thumb you can think that a jet airliner requires about three hours for a single 1000 NM trip).
After you have researched the routes and found a handful of them, we need to find suitable aircraft to fly these routes.
Acquiring Aircraft
Like previously described there are two possibilities to get aircraft - the used aircraft market and factory-new aircraft.
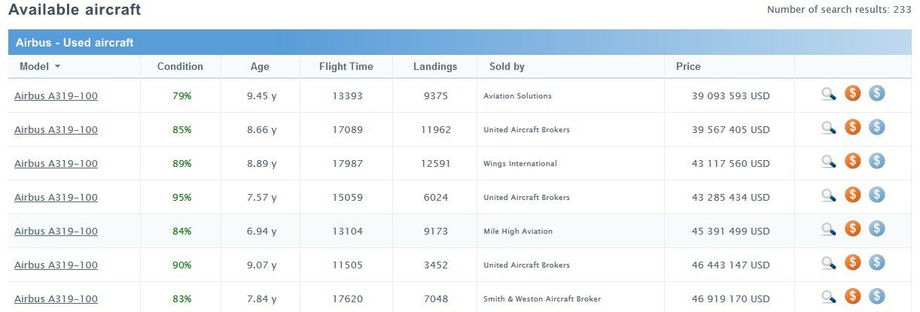
They are cheaper and you will get them instantly. The new aircraft built by the factory may have a long (2-6 months+) waiting periods, and we need to get our airline off the ground right away … so head to the Aircraft -> Used Aircraft page to scout the pre-owned plane listings.
Basics of Aircraft Financing
The startup money and other variables are set so that the recommendation is always to lease one to three aircraft from the used aircraft market. This is by far the easiest way to get started, and the Easy Start method has helped in this since you already have a few planes available.
Though remember, everything depends on your choice of airline type. If you decide to run a small regional carrier you may opt to lease many small aircraft to start with to just to cover the overhead costs; while a new large longhaul airline cannot afford more than 1-2 planes.
With aircraft (both used and new) there are two possible financing methods, direct purchase or operational lease. In this startup guide we like to state that you should always lease your first aircraft. You may consider purchasing later when you have more money.
Used aircraft are delivered to you in two weeks after the purchase. However, to make the game startup easier and faster, your first two planes are always delivered immediately to allow you to start flying right away. For factory-new aircraft, the delivery time depends on the order queue and construction time of the aircraft, and it is usually at least 2-6 game months.
Searching for Aircraft
When opening the used aircraft market, a long listing of all available aircraft for sale is displayed. However, since we already know what kind of planes we are looking for (based on what we’ve seen from the passenger demands etc.), we’ll wish to narrow down the search a bit. There are powerful search filters on the left side of the interface (similar also on many other pages).
In our example, we were creating a short-haul domestic jet airline. This effectively means that we’re looking for a jet that has about 150-200 seats and can fly around 1500-2000 NM max. In other words these would be Boeing 737s, Airbus A320s or McDonnell Douglas MD-80/90s perhaps – if you’re familiar with the models. But, for this example, we’ll enter the search filters: range – “> 2000 NM” and max capacity – “< 250 pax”. This brings up a list of suitable planes for our intended operation, in alphabetical order. (Again, keep in mind, that your airline’s strategy may be different!)
Suitable used aircraft may not be always available! If you cannot find anything with the first search terms do another search with alternate search terms. If still after a while of browsing there are no suitable aircraft you may need to change your strategy - then you must go back and do some more route research and try to find suitable routes for the aircraft what are available. The used aircraft market has both player and AI controlled sales listings and depending on the market status (supply vs. demand) some popular aircraft models may not be available at all times, be prepared to do a "plan B"!
Choosing the Aircraft
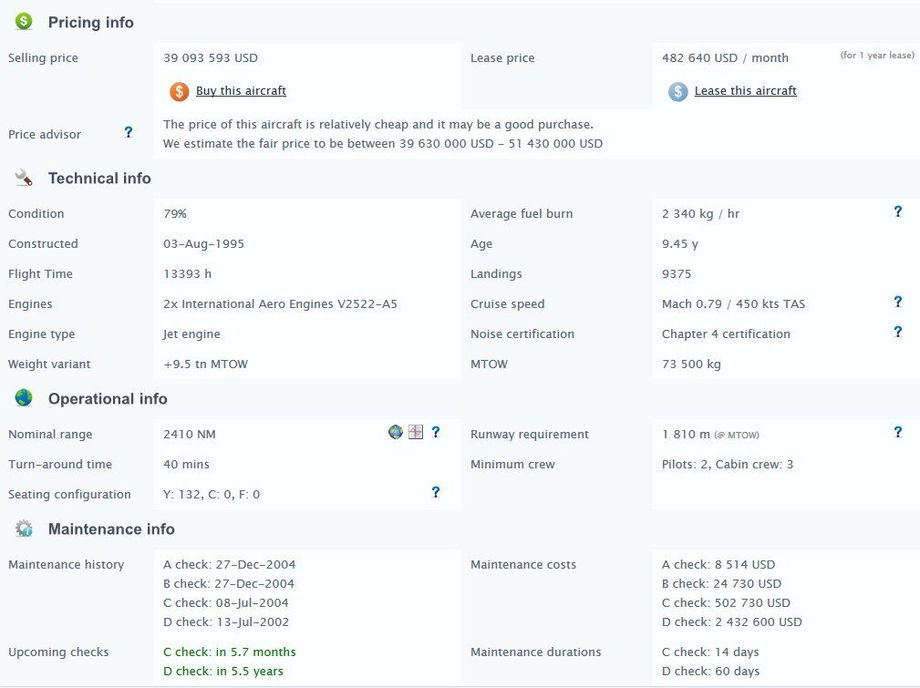
When you are buying/leasing an used plane, always remember to check the plane for its age and condition. Also important is the time left before the next "C" and "D" checks (heavy maintenance). Both of them are expensive, especially for old aircraft and will take a long time to complete.
The estimated operational time of an aircraft is 30-35 years. From 25 years and on, the condition of the plane will decrease faster and its maintenance will become more and more expensive. Also, it's not recommended to choose an airplane with the condition under 70% as it has a high maintenance costs and poor reliability (the general maintenance condition of the aircraft is measured in a relative scale between 0 and 100%; normally the plane’s condition should always be 75% or more).
As a startup company you should try to find the most economical aircraft possible as at the startup money is everything to you. Don't buy too new and expensive planes as you cannot afford to get very many of them. But don't buy too old or poor planes either as that will end up costing you even more when the maintenance costs and flight delays start rolling in!
So check at least price, age, condition, next maintenance date and that the aircraft is suitable for your routes and airport (passenger capacity and runway requirements).
If your airline already operates Airbus A320 series planes, you are good to lease A318, A319, A320 and A321s since they all fall under the same fleet group and your airline already has the administrative and maintenance support for this model. Adding a second fleet group, such as Boeing 737 will add significantly to your overhead costs and should not be considered until your airline is larger!
Signing the Deal
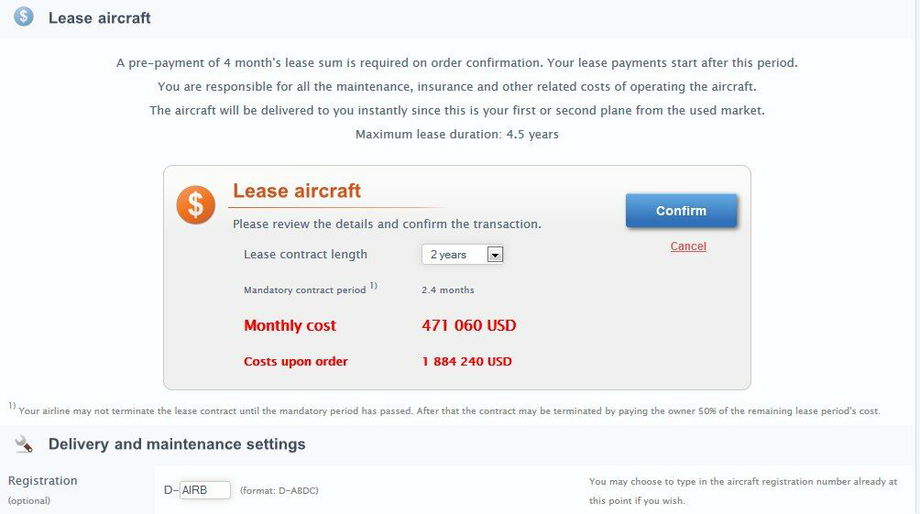
When you have found the suitable aircraft, and once more checked that any C/D checks are not due in near future, you may proceed to the lease page by clicking "Lease this aircraft". This page presents to you with the details of the aircraft once more and at the bottom of the page the option to choose the lease contract length.
You should be aware that the longer lease you sign the cheaper the monthly lease rate will be.
However do not sign a too long deal! Since breaking the contract in the middle of the lease term is very expensive (half of the total ammount of the remaining lease), so choose only a lease duration that is suitable for you (taking into account for example the date of the next D check).
Please also choose the registration number for the aircraft. This is the individual identifier of the aircraft in your company (you may also do this at a later stage but it is recommended to do now).
After confirming the deal the can be viewed from the "My Aircraft" and/or "Aircraft On Order" page. Depending on how many aircraft you had previously, this used aircraft is delivered within 2 game weeks or instantly (if you didn't have any other aircraft yet).
Next thing to do is create routes for it, based on our earlier plans.
Opening Routes
We have already done some initial route research in the earlier parts of this chapter, but now when we have the aircraft coming to our fleet, it's time to actually open new routes.
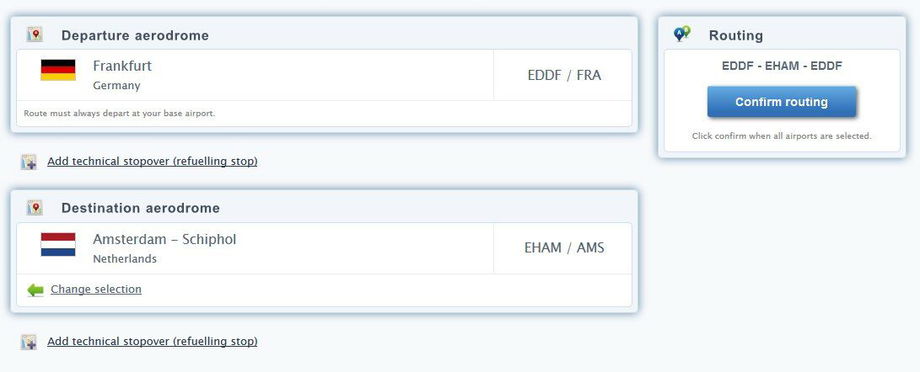
Let's move on to the actual route opening. Click on to Routes -> Open new route page. This page has exactly the same search tools as the Route Planning page, so simply bring up the list of airports again by clicking the View airports button. You’ll see again the familiar listing of airports with three icons. You may again use the globe icon (the third one) to open a pop-up of the route passenger demand details if you wish to re-check it.
Once you’ve found the suitable destination click on the green checkmark icon to select it. This will minimize the airport listing and show the selection. If you are happy with it, click Confirm routing from the right-hand side.
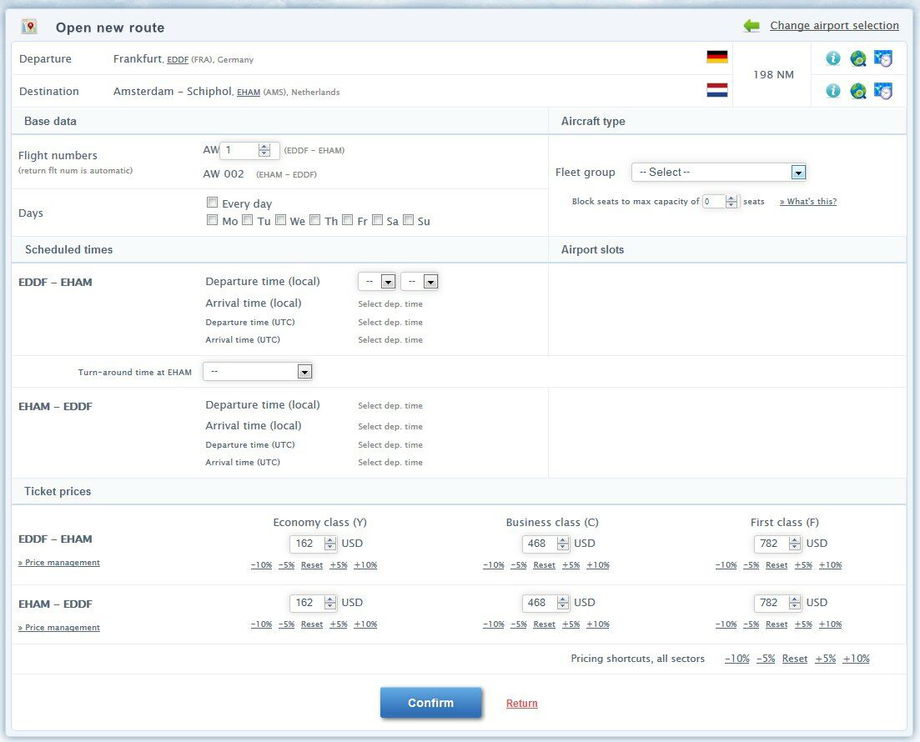
This brings us to the route opening (and editing) interface.
Route Editor
At first the route editor may appear a bit complicated but take a moment to look at it, and it’s rather simple after all. You’ll be using this function many times as all route opening and editing happens from this view.
The route editor window is the basic tool for opening (and later editing) the routes. On this page, you choose the days of the flight, flight number, aircraft type (the aircraft fleet group) to be used and also the flight departure and turnaround times. You can also edit the ticket prices already here. You may also again view the airport information by clicking on the airport names, or view the route planning pages by clicking on the globe icons, or view the airport slot data by clicking on the world clock icon next to each airport at the top-right corner.
Aircraft Type
The first thing is to select the aircraft type from the dropdown menu.
The routes are created for the whole group of similar aircraft, called a fleet group. This means that if you have many different sub-models of the same aircraft family in operation, the route can be used for all of them (since they have the same flying speeds, thus the same scheduled flight times). The models you own/operate are listed at the top - so select the aircraft you just got from the used aircraft market there. If you bought a Boeing 737-600 for example, this route is planned for the whole group of 737s (-600/-700/-800/-900) and can be later assigned to any such model without having to edit the route.
Flight Days
Then we’ll select the desired flight days. 7 days a week, every day, is highly suggested and should be the standard for all your routes (unless it’s a very long route). Flying a route 1-2 times per week to a destination does not attract passengers as it is a poor connection. Also at the top section of the page you can find the flight number - this is automatically generated but you may wish to change this if you like.
Flight Number
You can also choose the flight number but for most cases the automated number suggestion is just fine. Note that the same flight number cannot be assigned to other routes (unless it's to the same destination on a different day).
Departure Time
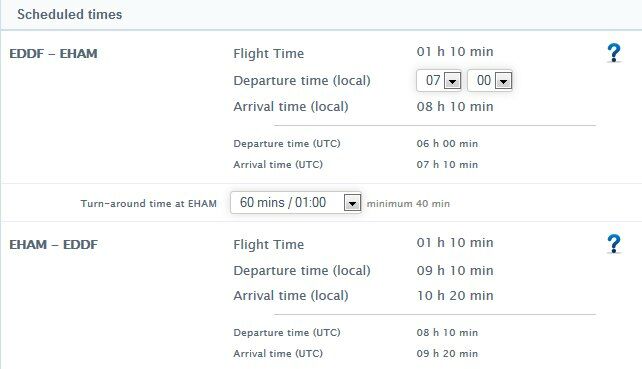
The next step to choose is the departure time of the first flight ("flight leg") of this route. This selection can be found from the Scheduled times section next to the data of the first flight leg.
When you choose the departure time the flying time and all other data is calculated and appears to the screen. If you wish to alter the departure times of the other routes you have to change the turnaround times of the flights.
When choosing the departure time, please be aware that passengers generally do not like to depart or arrive in the middle of the night (between 2300 and 0500). Also, keep in mind that if you have many flights to the same destination (later on in the game), their departure times should be spread out evenly throughout the day - having two flights depart nearly at the same time is bad for business.
Turnaround Time
When you have chosen the departure time and see the flight data, it is also advisable to increase the turnaround time on the ground to avoid flight delays.
If the turnaround is too short, the return flight may be delayed, and over time the delays may compound leading to flight cancellations. Both of them are not good for the reputation and image of your company. In this startup guide, we are not going into too much detail but just remember to increase it a bit - for A320/B737/MD-80 for example a suitable turnaround is 60 minutes.
Airport Slots
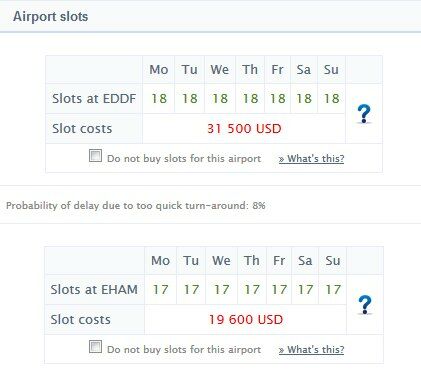
Next step to check in this screen are the airport slots. The airport slot is a reserved capacity at the airport for this flight. If the airport is over capacity, there are no slots for that period and you can't fly there at at time.
Slots are arranged on daily and hourly basis and automatically managed - they cost a nominal sum to acquire (depending on how busy the airport is). You will see the slot availability on the mid-right side of the route editor.
If it shows zero on some day, you cannot create the route – please adjust the flight times or days in that case. You may view the detailed airport slot data from the adjacent icon ("world clock").
The row below that also displays the slot costs - these are one-time fees that you must pay for opening this route (hover mouse over the blue (?) icon for more information). But, for now, you shouldn’t pay too much attention to the slots, just make sure none of the figures is not zero (0) and you will be fine.
Ticket Prices
Finally, please check and adjust the route ticket prices. The system automatically calculates suggested price values for the route. You may want to adjust these prices to a bit lower price, but not too low so that your profits do not suffer.
As you are a new airline, you are unknown to the public and you may compensate this with lowering the prices about 10-20% - as cheap prices make people more interested in your services. But, when your image and brand awareness starts to rise, make sure you raise the prices again slowly.
Note: The system automatically shows all prices for all three travel classes although your aircraft may not configured to have these seats. The prices are still set despite of this to be ready in case you later offer seats in that class on this route.
Once everything is set, press Confirm to open the route.
Special Considerations on Routes
Before actually opening the routes, you should be familiar with the capabilities of your aircraft. The range it is able to fly and the runway requirement it has (if you are operating to airports with short runways).
You can also fly your aircraft beyond its normal range but this means that the payload (passengers) must be limited and this is not advisable (see the Payload vs. Range graphs for more details from My Aircraft pages). Another option to fly long routes is to make a technical refueling stop in some airport along the way but that is generally not recommended.
As a reminder, your routes have to start always from your base airport. If you chose London Heathrow as your base, all flights from your airline are going to start from there. You may open bases at other airports later in the game according to various rules (see respective manual page: Base Airports).
Scheduling
Before any route can be flown it must be assigned to the flight schedule or flight program of a particular aircraft. This means that this new route must be assigned to an individual aircraft which flies the route. Naturally, the aircraft must have enough free space in its schedule so that it is able to fly this route.
The schedule covers each day and each hour and from scheduling page you will easily see where each of your planes is flying at a certain time.
To access the scheduling page, click either on the link on the green message box that you get after creating the route or use the main navigation menu to move to the Scheduling page.
At the Scheduling page you will see the flight schedules of your planes. For the latest aircraft, the schedule is empty and you might also see a red warning icon because you do not have the line maintenance scheduled (these are the A and B checks).
Adding Flights
To add the previously created route to the schedule of this aircraft, click on the (+) icon on the right side.
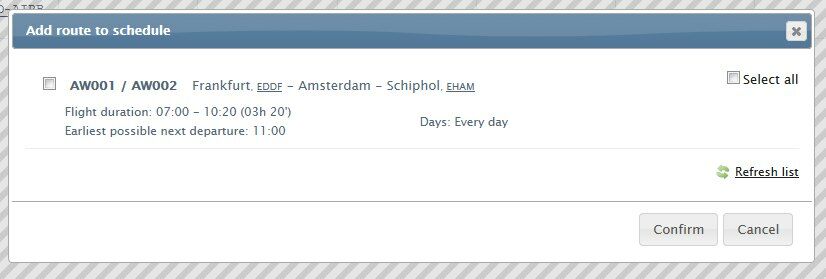
It will bring up a dialog listing all available (unscheduled) flights that are available for this particular aircraft fleet group.
Simply select the flight you previously created and confirm the selection and then the route is added to the schedule. Without scheduling the flight, it won’t ever be flown so this is an important course of action.
After this, you will see the scheduling view again now with some blue bars in the daily view - these blue bars are the flights, as we've explained previously. White area is naturally empty and non-used time for the aircraft.
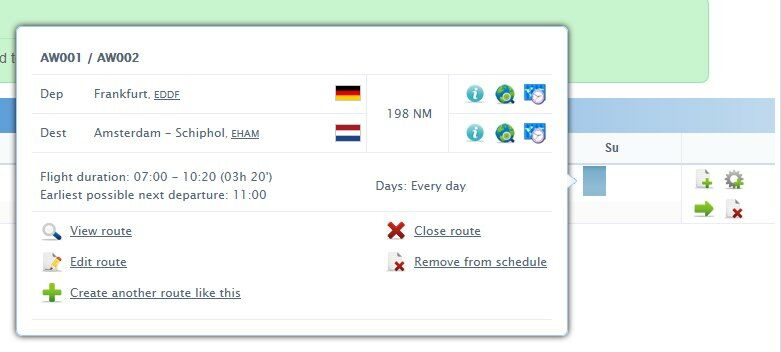
By moving the mouse over the blue bars a dialog will appear telling you the details of the flight, and clicking the blue area brings the full route information to your view.
The route is scheduled and will fly soon! But this is not enough yet - we only have one flight, and no weekly/monthly maintenance checks!
Next we must open more routes since one route per aircraft is NOT enough; as you can figure out from the picture - lots of white, and very little blue 😬. We must 'fill up' the schedule with "as much blue as possible" (= flights).
But before that, let's assign the line maintenance checks - they are important!
Weekly and Monthly Maintenance (A & B checks)
Your planes need weekly maintenance attention so that they don't fall into pieces. There are four types of aircraft maintenance (you can read more from elsewhere in this manual).
The A and B checks are "line maintenance" which means that they are normal light maintenance to keep the planes flying and they include normal service like filling oils and similar simple things. C and D checks are "heavy" maintenance and those require more work.
The A and B checks are scheduled into each plane's rotation / schedule from the Scheduling page, and you must add them for all of your planes otherwise the condition of the planes will drop, they will get technical delays and the aviation administration may even fine you if your plane is not maintained properly. C and D checks are managed separately (automatically by default).
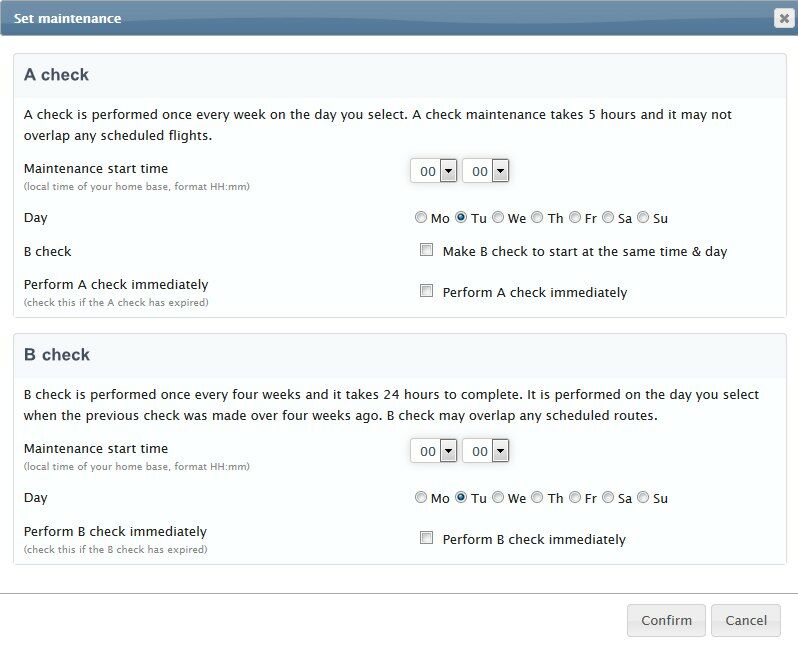
To add the A and B checks press the wrench icon from the schedule next to the aircraft’s flight details. Clicking this opens the maintenance window where you must select a time and day for the A and B checks.
Note the following rules when choosing the maintenance time:
A Check
The A check may not overlap any flights on the schedule. It is performed every week and it takes 5 hours to complete.
B Check
The B check is performed every four weeks and it takes one full day. The B check automatically overlaps all other schedule events (flights and A checks) on that selected day, and thus it is represented on its own line on the scheduling view.
Expired Checks
If your plane's A or B check has been expired for some reason then you can instruct the maintenance department to start them right away (the system will advise you of this too).
Tip: Since people do not wish to fly at nights a good time for A check is at midnight for all shorthaul fleet. This way the aircraft is out of operation between 00-05 on the selected day. For B check you can choose the day with the lowest demand which usually is Saturday. Please keep in mind that B check automatically overlaps any flights (it's not counted as a cancellation) and you do not have to keep empty space for it, unlike for A check.
In this example image below we’ve added A & B checks to Saturdays. Once the checks have been added, you’ll see the gray maintenance bars added next to the blue flight bars in the schedule view.
Opening More Routes
You have only opened the first route so far. However this is not enough.
To open more routes, just follow the same path as you did with the first route. Note that the routes may not overlap in the schedule (so second flight cannot depart before the first has arrived and a turnaround time has passed).
You must also take into account the turnaround time of the aircraft (fuelling, boarding ..etc) - in other words the next flight cannot depart directly after the next has landed but it needs allowance for the ground operations.
Our example’s normal medium jet like A320 or B737 has a minimum turnaround time of 35-40 minutes (depending on the model). This means that if our flight lands at 12.00, the earliest the next flight can depart is 12.40 (if turnaround minimum is 40 mins). The scheduling system’s flight information popup (hover mouse over the blue flight bar) advises of the earliest possible next departure time after each flight.
However, please note that using the minimum turnaround time, at home base or at outstations, is not advisable. This often leads to flight delays and even cancellations - so it’s advisable to increase the turnaround times a bit (let’s say 60 minutes in our example; so make the next flight depart at 13.00 instead of 12.40).
Also please keep in mind that your aircraft scheduling should maximize the air-time of the aircraft. In other words, the schedule should be as full of flights as possible. An example of effective scheduling is displayed in the following image.
Tip: If you are having trouble in getting the schedules built and working around the flight times it is advisable to create the routes first without the airport slots (use the 'Do not buy slots for this airport' checkbox in the route editor window's slot section). This way you can edit and adjust the routes freely without any cost. And only after you have completed the route structure you can edit the routes to the airport slots. Without slots the route will show in scheduling (so you can create "mock schedules") but won't actually be flown. This technique is useful if you have many routes for each aircraft and can save a lot of money since each route departure time change (= slot time change) costs a bit.
Route Profits
You can see the financial balance and other data of interest of the aircraft by going to "My Aircraft" page and there viewing the overview or by clicking the aircraft name for more details.
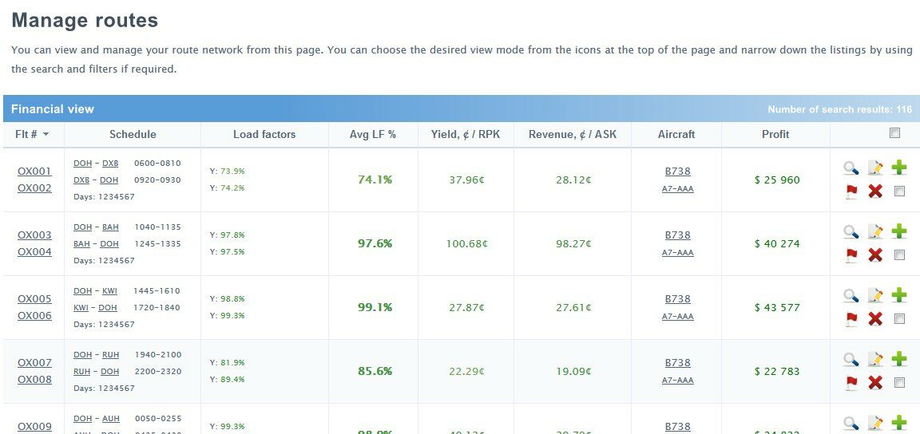
Once one day has passed, you can view the route details from Routes pages. Clicking the route number brings up the extended route information page. There you can view all the details, manage prices and so on. This page also displays information about flight delays and cancellations on this route. These are very important items to keep an eye on.
If you feel that the route is not performing well, you can edit it by clicking the edit icon.
As a new airline, your "Route Image" on each route is low. Each new destination you open will initially have very low sales - but do not be alarmed of this; it takes up to 10 game months before you reach the full awareness and full potential. Make sure you do not burn out all of your cash reserves as you will most likely be generating losses during the first months of your airline operation.
Staffing
Let's take a quick look at your personnel at this time, since happy staff is key to your success.
You can either manage the staff manually or let your human resources manager (HR) to do the job. The HR manager checks for the staff and salary situation of your airline every day (of game time). This is by far the easiest option, and also the default option, so you may leave everything at the staff section as they are.
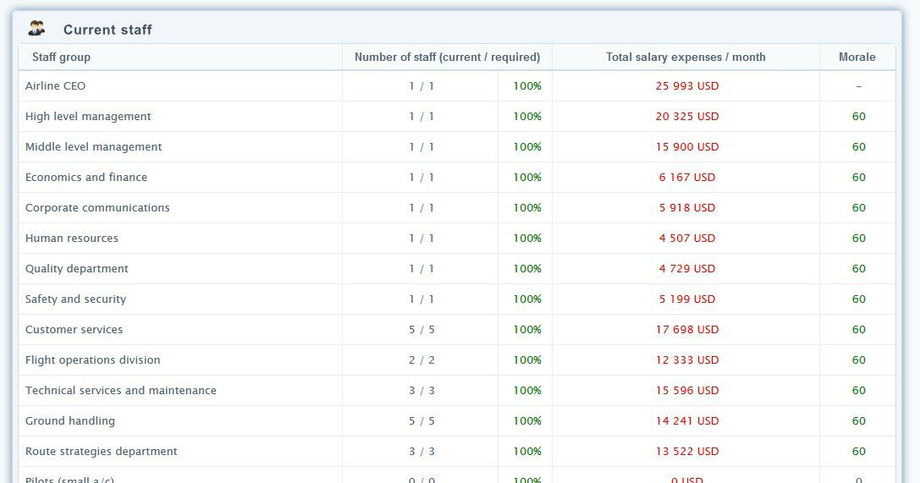
You can view from the Current Staff section (Office -> Personnel office) that all positions are filled (100% ratio) and that employee morale is good (over 30-40% in green). The morale effects on how motivated the employees are working with you. Keep them happy by employing enough staff and giving pay raises when they want! Unhappy staff causes bad things to your company, such as additional flight delays.
Tip: The salary of Airline CEO is your salary. If you wish to save the last penny you can reduce that without problems.
Marketing
You must advertise your company and routes so that people know what your airline is. This, and almost every other aspect of your company, affects the company image of your airline. In other words, this is your airline brand.
Company image is a measurement of your company's public image - how well people know your airline and what they think of you. Advertising can be used to raise the image. Bad things like delays, cancellations, unhappy staff and problems with planes and so on will lower the company's image. Even word-of-mouth can raise the image - just by keeping a good aircraft fleet and happy staff has a positive effect on your brand and this means more passengers and more money to you.
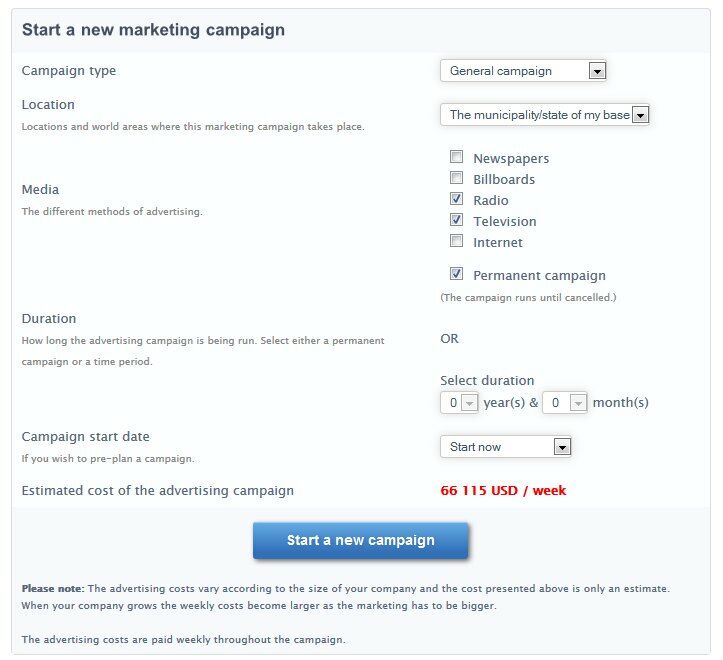
To start raising the awareness about your firm you must schedule marketing campaigns. This is done via Office -> Marketing page. There you can view the current campaigns that you have and start new ones.
Please remember that you must have always some marketing campaigns running. Otherwise your company image takes hits easily from flight delays and other unpleasant events. And if your company image goes to well negative values people will not fly your airline anymore so keep a close eye on that!
Later, to start a new marketing campaign, simply select where the campaign is located, which medias are used, and how long it should last. You will then get the price estimate.
Make sure you start a companywide "General campaign". There is also the option to market individual routes (Route campaign) but these are not necessary at first if you wish to save money (the route specific campaign will raise the route awareness faster on new routes but has very little effect on the companywide image). It’s by far easiest to create a permanent campaign, since this way you do not need to micro-manage the marketing – just set up the campaigns and adjust later if they are too costly, or too ineffective. Remember that the changes in company image too take time and do not happen overnight.
You can now sit back for a while and see how your airline grows.
We recommend you to visit each page and/or function of the game to familiarize yourself with all the available methods of managing your airline. And when you think it's the time, open new routes and acquire new aircraft just you did the first time.
But you should keep your head cool and not to expand too rapidly, remember to keep reserves. Good luck! 🙂
When you are ready, read the Part 3 of the tutorial to learn about avoiding costly mistakes.


