Assigning your routes to aircraft flight schedules is an integral part of your airline management. This process, called Scheduling, determines which aircraft in your fleet flies each route. As well as scheduling routes you need to create a weekly maintenance schedule for your aircraft in order to keep them airworthy.
Introduction
All of the basics on how to plan, open and schedule a new route are covered in the Getting Started chapters. Please review that chapter first if you are not familiar with the scheduling concepts since here we shall only explain the use of additional functions and give some tips.
But to recap quickly, the main points of scheduling are:
Choose the fleet group that will fly that route (it determines the flight times).
Each route you wish to fly must be assigned to an aircraft of that particular fleet group after the route has been created. It is flown only after this is done.
Each route can be assigned to only one aircraft at a time.
You must also assign A and B maintenance checks to the aircraft's schedule. A checks are performed weekly. B checks are performed monthly (a B check includes an A check).
Flights obviously cannot overlap each other in the schedule of an aircraft.
Schedules can move between aircraft in the same fleet group or to any other suitable fleet group (in which case the system automatically edits the routes for you).
Adding Routes
Creating routes and adding them to the aircraft schedule is explained in the Getting Started chapters.
To open the "Add Flight" interface simply click on the green plus ( + ) icon next to each aircraft's flight schedule. This will open a popup dialog showing any available flights for this aircraft type. Simply choose the route(s) you wish to add and the system does the rest. If there are no flights in the list, you must naturally create some first from the Open Route page.
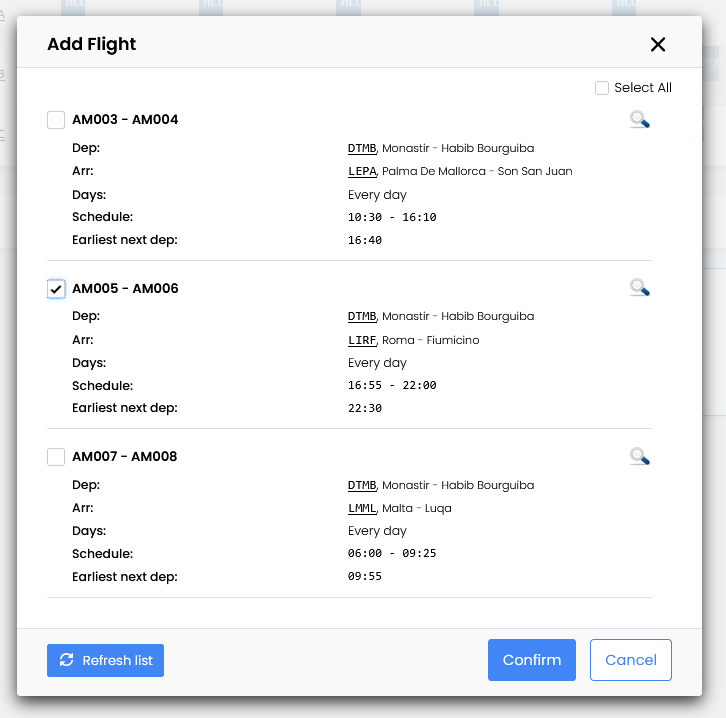
The key points to remember when adding routes to aircraft schedules are:
The route must be created for a particular aircraft fleet group. You cannot assign a route created for a Boeing 737 to an Airbus A320 schedule. You will need to edit the route first.
Flights in the schedule may not overlap each other (one aircraft cannot fly two routes at once of course).
Remember that you need to also have a proper turnaround time between each flight. If the flight lands at 20.00, and aircraft's minimum turnaround time is 30 minutes, the next flight can next depart at 20.30 at the earliest. However, it is usually recommended to use a longer than minimum turnaround time to avoid delays (in this example about 45-50 minutes would be better).
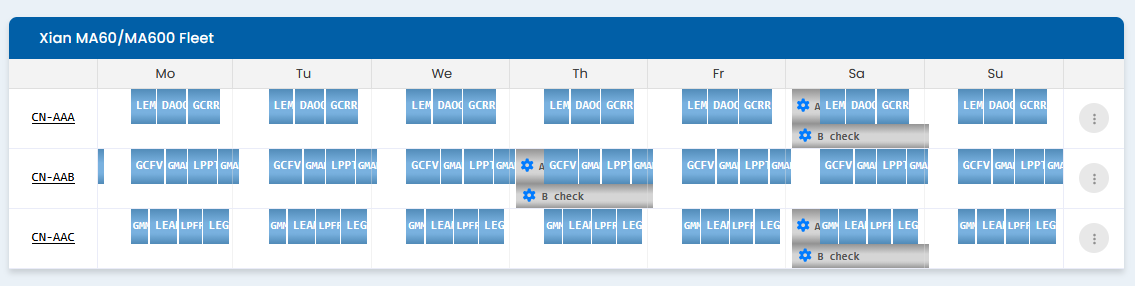
Also be aware that, in order to be profitable, you will need to maximise your aircraft flying time. Take a look at the first picture in this chapter and see how the schedules are full of flights (full of blue bars).
Adding Maintenance
Scheduling of aircraft maintenance checks is also important. The basics of this are again explained in the Getting Started chapters of the manual.
The "Set maintenance" window opens from the wrench icon next to each aircraft. In this mode you can assign the A check and B check to each aircraft - remember that both are mandatory and flying an aircraft with expired checks will lead to a heavy fine from the aviation authorities and comes with an image loss too.
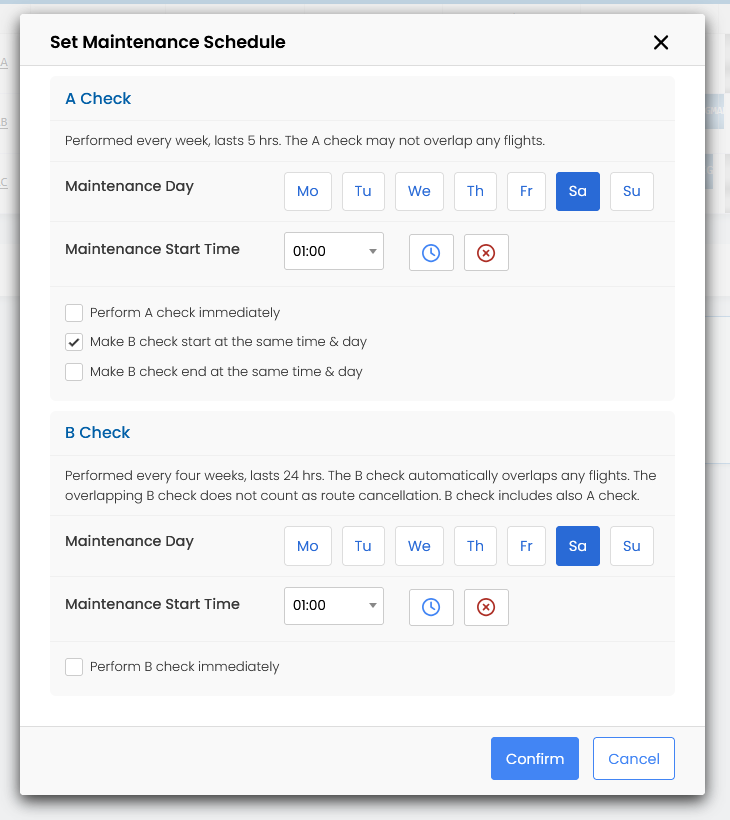
The interface for assigning the checks is simple: Choose day and time for both A & B checks. There is also options to perform the maintenance checks right away if they are expired (and in such case the system will automatically suggest this for you too).
An A check may not overlap any flights on the schedule.
While a B check, performed every four weeks, will automatically replace any flight it overlaps (but it does not count as a flight cancellation).
Moving Schedules
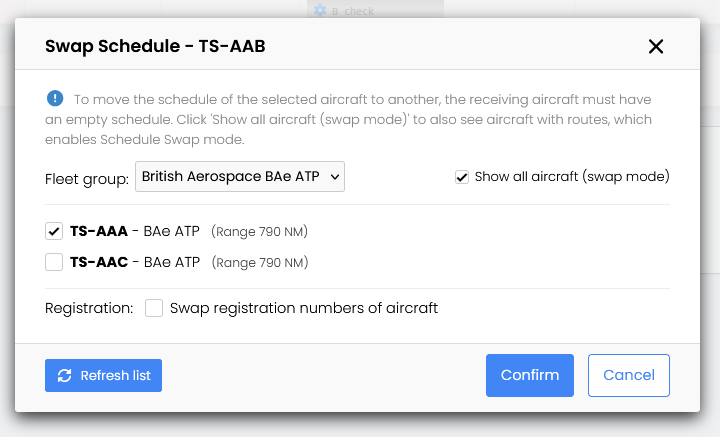
The schedule of each aircraft can be moved to any other aircraft with a click of a button. The aircraft receiving the schedule must not have any routes in its schedule already (and the moving menu will only show such aircraft automatically).
The "Move schedule" window opens from the green arrow icon next to each aircraft. Then choose the receiving aircraft and confirm.
There are two types of conversions:
Moving the schedule between two aircraft of the same fleet group
This function will not adjust the flight’s parameters or flight times since the aircraft in the same fleet group fly with the same speed.
However the payload carrying capability may change since different models may have different runway performance or a different payload capacity.
Remember also the possible different noise levels vs. airport noise regulations which might disallow the transfer.
Moving the schedule from one fleet group to another
Using this method you can let the system to automatically edit all routes for the new fleet group. You can do this also individually from the Edit Route function but this feature is much quicker (however in some cases you need to edit the routes manually, and especially if you wish to fine tune the schedule).
When using this method it is recommended that the two aircraft types in question are similar. If there are notable speed differences, the automatic schedule moving/conversion might not work (since airports may be closed during some hours).
This function has an additional option related to the turnarounds of the flights:
Maintain the original departure times: When this (default) option is chosen the system aims to keep the departure time of each flight sector the same as in original sector by varying the turnaround times. This is useful if you have a night curfew at an airport, but can on the other hand make the turnarounds too short if the new aircraft is slower than the original.
Use the default turn-around times: If you have set a default turnaround time for this fleet group you can use it instead for all of the flights. In this case, the departure times from the home base remain but the outstation turnarounds use the default time.
Use minimum turn-around times: If there is no default turnaround time set, then the option is to use the minimum time instead (logic is otherwise the same as in the previous, default time, option).
You have also the option to move the aircraft registration number and to perform A/B checks immediately, if necessary.
The system automatically knows the type of conversion to perform, based on your selection of aircraft. Remember that only aircraft with empty schedules are shown as potential targets for moving the schedule.
In case there are any errors in the conversion no routes are moved to the new aircraft. You will need to check where the error is and adjust the routes manually using the Edit Route function (and then Add the flights to the schedule of the aircraft again).
Flight Functions
You can quickly view and adjust parameters of each single flight in the schedule by simply hovering the mouse over each flight (over the blue bar representing each flight). This opens a new popup window showing the details of each flight.
When using touchscreen devices tapping the flight will open the same popup window.
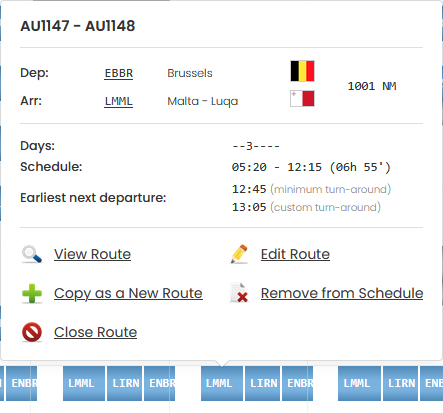
As you can see this quick-view window gives you details of this particular flight, with some direct functions related to this flight.